Pages

Subscribe:

Thursday, October 20, 2011

Wreath

So I found this really cute wreath on pintrest  and I decided I had to do it! 

You need 2/3 a yard of heavy weight orange felt 
dress makers pins 
a wreath ( I used a 10" one)
top of a 15 oz can 
if you can find or make a cute spider. (I didn't do this part yet)

1. I used the top of a 15 oz can to trace a bunch of circles on my felt. 

2. You cut the circles out then you fold them in half and then in half again and take your pins and pin it to your wreath 

I think it looks better if you change the direction that you pin your circles.


3. Cover the entire wreath

4. Now I already have something that i can hang my wreaths on but in the tutorial it shows you how to attach a ribbon if needed. 

Here is my end project 


I am on the look for a spider to go on it. 

HAPPY HALLOWEEN!! 

Wednesday, October 19, 2011

Pumpkin

I decided to try and make a paper pumpkin yesterday as my craft. Now most of you don't know but I can not cut things out! I can sew but scrap booking or anything to do with cutting paper in perfect circles, squares, or any shape I am HORRIBLE at it. So here is my attempt at making a paper pumpkin. I hope this inspires all of those who aren't martha stewart to still  have fun and do it anyways!


My sad circles ( I even traced a perfect circle and look at them! lol)

I made 12 circles (I don't think there are 12 in this picture but I did 12)

Then you fold your circles in half and glue them one to another until you have a circle of paper! I cut off the bottom of the circles so that it would stand up straight. 


 To finish I took a piece of green construction paper and twisted it and then glued it to the top. After I took the pictures I cut off the white parts that are showing so it does look a little better now but still it looks like a child did it. THATS OK! not all of us are Martha Stewart but at least I had fun. 

Tuesday, October 18, 2011

Chocolate Bowls


CHOCOLATE BOWLS!! 

I decided to try to make chocolate bowls last night so we could have ice cream in chocolate bowls for family night. It was easy in theory you blow up ballons and dip them in chocolate. 


Then after the chocolate had dried you pop the ballons and the chocolate bowl is left. Well that did not happen for me (yes I am sharing a failure instead of a tutorial). I only got one bowl to actually leave the ballon. When I popped the ballons in the first batch (yes I had to do 2 batches) The bowls popped with them! lol no more bowls left. So then I did it again and I tried to remove the bowls with out popping the ballons I got one off successfully! (Go me!) So anyway I think it was because my ballons were not the long skinny thin kind so I will try again and let you guys know how it goes. 


My lone survivor 

Just keep trying its fun even when you don't succeed!! 

Monday, October 17, 2011

Oh The Things They Say

Oh the things a 2 year old will say. 

Looking up at me while gripping my legs and grunting, "Mommy your heavy". 

While playing around with the hubs new iphone 4s I asked Siri if I was crazy. From the back seat "YES!"

When she was throwing  a fit I said, "Mommy is done" and she looked at me very stern and said, "M. is DONE!" 

Little M's version of Popcorn Popping on the Apricot Tree. 

Popcorn (clapping hands) POPCORN (just shaking her hands) POPCORN!! (Hands above head). Smells so good (smelling her hands) wasn't really good (shaking her finger at you) POPCORN!!!! 

Happy Monday Everyone hope this made you smile! 

Monday, October 10, 2011

The Flintstones!

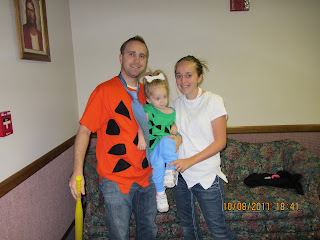
 Our family had a Halloween party this weekend and so I got to work on our costumes. I love costumes that tie the whole family together. This year I thought we would be the Flintstones! So off I went to the craft store to purchase the appropriate things to make these costumes. Now I like to look very similar to the characters or themes that I choose. However, I did need to accomplish this while staying modest with everyone :).  So here is my Modest Flintstones! 

1. I bought just some plain t-shirts in the correct color (orange, green, and white), some black felt, some blue pants for little M. (She had nothing blue lol), and the hubby used a blue tie he had in his closet.


(Apparently I only took pictures of little m's stuff and none of the others before the project) 

2. So I started with Pebbles. Little M. is really small and I didn't want to buy a nice shirt just to cut it up. So I bought a shirt from the craft store and just raised the hem and cut off the sleeves. Then I took my felt and cut it into little triangles. 

Then I placed the triangles where I wanted on the shirt and pined them. 


Finally I sewed all of the individual triangles on to the shirt. 


(I cut the sleeves of the shirt after I took all the pictures)

Then I took a piece of cardboard and cut out the shape of a bone. I cover this bone in white paper and then hot glued a hair clip to the back. 


3. Then I moved onto Fred Flintstone. 

I cut up the bigger triangles for this costume and did the same procedure as I did with pebbles. At the end I took the bottom of the shirt and cut it up. 


4. Then I moved on to Wilma. I actually Didn't take pictures of Wilma because I finished wilma like 3 minutes before we left for the party lol. I just took the bottom of a white shirt and cut it up, wore pearls, and my hair in a bun. 

And here is the final look! 


Thursday, October 6, 2011

New Button

I successfully made my own button for my blog today! I feel very accomplished. I can't take all the credit well none of it really. I used a really super easy tutorial over at oikology101. Since she was so nice to teach me how to do it I thought I would share her tutorial with everyone!
Here is her button so you can jump right on over to her awesome blog. Also here is a direct link to the post about how to make your own button!


How To Make Your Own Button


Also please grab my button! 

Mail Time

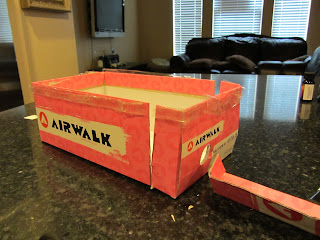
Yesterday was a rainy day and Little M. was itching to go outside. She would look out the window and just say M. outside please. I felt so bad that she was so bored and all she wanted to do was go play. So I put my mom hat on and tried to think of something fun and exciting we could do inside. Little M. loves to go to the mailbox and since it was so cold and rainy outside we couldn't go. Thats when it hit me we could make our own mail box! When I told little M. she was very excited.  I made it look more like a real mail box as opposed to the cut a hole in the top of a shoe box kind of mail box. Here is all of our fun!


I cut the front of a shoe box including the lid so that it can open as door. 


I put tape around the edge and then put on the lid. 


I cut the flag out of cardboard and made sure it worked. I used a push pin because I didn't have a tack a tack would probably look better


Then we painted!!!


Then we took some paper made some mail and played! 

This saved our rainy day Little M. played with this all day and when daddy came home she was so excited to show him!

Wednesday, October 5, 2011

Chores

So Little M. has had her little chores to do around the house since she was about 1. It is so cute to watch her try to accomplish something and sometimes it takes a lot of patience. No matter how frustrated I get in the end I look at her little face and how proud she is of herself it is worth every frustrating moment. Here are some of the chores little m. loves to do. 

Help with laundry: She helps me put the clothes into the washer and change it to the drier. This takes her at least 5 min to load the washing machine and probably 10 min to switch them to the drier. She gets so excited when we start to sort the laundry! She also helps me fold laundry by handing me things to fold out of the basket. She has done this chore since she was 1. 

Windex a mirror: We have a swinging mirror in our bedroom Little M. helps windex the bottom of this mirror. This is something I try to live with :). She gets more finger prints on the mirror cleaning it then there was on there in the first place. However, When I was at church one week a mom shared a story about how one of her children had told her that he didn't want to do chores because she just went back and fixed everything he did. I decided then that I wouldn't fix the chores that Little M. tried to accomplish.  So this mirror is pretty much always dirty on the bottom but little M. will show daddy her clean mirror when he gets home and she is so proud of herself. 

Dusting: She is in charge of helping mom dust the upstairs. This is just hilarious I love watching her decide what needs to be dusted.  One week my bed spread needed to be dusted she sat there for ten min or more just wiping my bed off. One week it was the mirror lol that just made the dirty mirror worse but it was pretty cute to see her try to help mommy. 

Making mommies bed: This was a chore little M. gave herself. Every time I make the bed Malia brings me all the pillows sometimes she hands them to me and sometimes She puts them on our bed herself.  Some mornings my bed really does look like a 2 year old made it but thats ok because a 2 year old did! 

I think this has helped little M. feel like she is important and usefully in our house and hopefully it will help her build her confidence. 

Have a Happy Mommy day! 

Friday, September 30, 2011

General Conference


This is for all of my moms out there who are always trying to find things for their kids to do during General Conference. 

I love the packets that the people over at Sugar Doodle have! here is a link below to their packets. 


The church also has some cute coloring pages. 


Deseret Book also has a free booklet download. 


It sure helps little M. sit and pay attention at least a little. Have an awesome Conference weekend everyone! 

Painting Time!

So little M. is learning about apples and the color red this week. So we decided to do a little art project incorporating the two. We painted with apple stamps and little M. had so much fun. Here are some picture of our fun. 


We cut the apple up together and looked at the stem and the seeds inside it. Then we cut the apples into different shapes to be stamps. 

  
Ready to go!


Having tons of fun learning about the color red!

The end project became more spread the paint with the apples instead of stamping them but its still pretty. 


Wednesday, September 28, 2011

Apples are Red

                                                                      
   Apple's are Red! 
  

I am a big believer in starting to do lessons with your little ones early on. Little M has been doing little  lessons since she was 1 and she loves it! I am always trying to find cute simple things to do with her during her lesson time. This week we are learning about the letter A, the number 1, and the color red. Here are some cute little projects I did with little M today. 


1. We just grabbed a picture off of google and put it in a word document and wrote underneath it. Little M. was actually really excited to color this. What 2 year old doesn't love to color. So We talked about the letter A and how Apple starts with A. I had her point out all the A's in the sentence below it and then we colored in with a red crayon. 

2. Next we talked about the number 1 the picture below is funny because it is supposed to be a number one with an owl next to it. She was so excited by our third project that she went back to this one and glued papers to it too. So we counted everything in the room that was only one thing. She got pretty excited then once again colored our paper. 


3. This was little M's favorite project by far. I took red construction paper and cut it into little pieces and let Little M glue (with a glue stick) all of the little pieces of paper to the picture of the Apple. This is when we talked about the color red and named all the things that are red. When I asked little M. what are some things that are red she pointed to the paper pieces and said "right there". 


I know this doesn't seem like that good of a project but if you have a little 2 year old who wants to do everything by herself this is perfect!